We know that sitting in front of a computer for long periods of time is not great for our bodies. It can contribute to neck pain and headaches, back pain, shoulder pain and wrist pain, amongst other things. So what can we do about this when our lives revolve around computers?
It may seem like an overwhelming and expensive task to get your desk set-up right, but little changes to your desk or chair can make a big difference to your body (you can check out my thoughts on standing desks here!) The best desk set up for you should support your body in a position that places the least strain on all of your joints. It should actually make sitting with good posture easier, not harder.
What is the ideal set up?
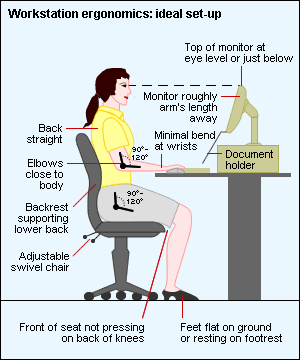
To begin with, you need to have a clear idea of what the ‘ideal’ set up looks like. The following picture shows how your body should be supported to put the least strain on your body:
Follow our 4 easy steps to achieve your best desk set up:
1. Take a photo
I’ve never come across anyone who likes seeing photos of themselves, especially side on and sitting at a desk! But this will make it much easier to assess your position and identify which areas can be improved. When looking at your photo, compare it to the above image, paying special attention to:
- Your hip ankle & elbow angle – are they at least 90 degrees?
- Your feet position – are they flat on the floor?
- Your height relative to your computer – are your eyes in line with top of monitor?
- Your shoulders – do they look relaxed?
- Your spine – is your lower back supported with a lumbar support? Or is it slouching into a ‘C’ curve?
- Your head position – does it sit above your spine? Or is it sitting forward with your chin poked out?
2. Make a few changes
I like to address things in this order:
- Adjust the height of your chair so that your feet are flat, your elbows are not too bent and the computer screen is not too low.
- Add or adjust lumbar support so that your lower back is supported in an inward curve
- Bring your chair in so that your arms are not outstretched to reach the keyboard.
- Adjust your posture – relax back into the chair, align head on top of spine so that chin is gently tucked in and relax your shoulders
Some extra tools that can help optimise your position include:
- A foot stool (or a few books) if your feet aren’t flat on the floor
- An external keyboard if you’re using a laptop
- A few books to prop your computer monitor up to correct level relative to your eyes
3. Take another photo
You can now take another photo of yourself and compare to the first. You should see a significant improvement in your body’s position at your desk and you should feel that your body is more supported and there is less effort in holding this new position.
Extra tips
Some extra tips
- You can buy a foam lumbar support to put on your chair if it doesn’t already have a lumbar support – much less expensive than an ‘ergonomic’ chair, but often more effective. (GLOW have plenty of lumbar supports in stock and they can be delivered straight to your door!)
- Sit your bottom right back in the chair and use the back of the chair to rest into – don’t sit on the edge
- Avoid holding the phone between your ear and shoulder – your neck will not be happy.
- Take frequent mini breaks – every 30 mins, at the very least just stand up. This will break the sitting cycle.
Finally
Don’t forget we are here to help! You can either send a photo of your workstation in to us for a few pointers, or you can organise a workplace assessment for the most accurate and personalised result (this is the beauty of us being a mobile service!)
Recommended reading from Glow
5 habits for a happy, healthy spine!
Are gym classes safe?
Standing Desks – are they worth the hype?
Micro-breaks – my top tip for desk workers!

